
Your bike does not just rely on the strength of your legs. It also needs a bit of lubricating oil, a lot of love and good listening. You may not know all the remedies needed for your bicycle to live longer, but you can gain enough wisdom in the process to keep it in top condition and leave the store with proper bicycle maintenance.
This series of almost eternal recommendations (until advances in bicycle technology make some of them obsolete) will guide you through your role as the primary caregiver-so you can leave the tricky things to the professionals.
Good rule of thumb
First, you can share car repair tools with friends
No. 2 If there is a thread, please lubricate it.
NO. 3 You cannot properly adjust a dirty and unlubricated bicycle.
No. 4 Perfect house swap art. There is no reason.
No. 5 nylon tire tie rods are better than metal tie rods.
No. 6 is measured twice and then cut. This applies especially to steering tubes and integrated seatposts.
No. 7 When disassembling, please pay attention to the order of disassembling parts. It removes the mystery of putting it back together.
No. 8 Check the tire pressure before each ride, especially if there is no tube.
No. 9 The three most important tools in riding: multifunctional tools with chain breakers, pumps or CO 2 and repair kits or pipes

Milkshakes, rattles and rolls

No. 11 Periodically check the bearing clearances in the earphones, hubs and cranks. To check your earphones, squeeze the front brake and rock the bicycle forward and backward. For wheels and crank bearings, pull the wheel or crank from one side to the other. If you feel shaking, your components need to be adjusted. Don’t ignore it, otherwise the problem will become bigger and more expensive.
No. 12 uses a torque wrench to check the tightness of the crank bolt once a month. If you just bought a new bike, check them after every ride in the first week.
No. 13 After you pack the bike for travel but before sealing it, shake it left and right to watch out for any loose or rattling parts. Then protect them.
No. 14 Loctite Threadlocker Blue 242 is a necessary accessory for bolts assembled with standard hand tools. It seals threaded fasteners and prevents them from loosening due to vibration.
Squeak, squeak, and squeak
No.15 If your bike makes a noise, it tries to tell you something. Don’t ignore it.
No. 16 A squeaky crank may be loose on the spindle. Remove the crank bolt, lubricate the threads, and then reinstall. Use a torque wrench to tighten all parts.
No. 17 uses a light lubricant to eliminate the squeal of the rear derailleur pulley.
no. 18 If your saddle squeaks, put a few drops of oil on the rail connected to the saddle, and then drop it into the clamp that clamps the rail. (But before that, make sure that the area is completely clean and free of dust and dirt-good cleaning may solve the problem.)
The technician at Main Station No. 19 wraps the handlebars.
No. 20 creates an “easy charging” station near where you store your bicycle, so you can easily plug in your bicycle computer, bicycle lights, and even electronic shifting after riding, so you won’t be in half a century later Power off.
Respect your mechanic
No. 21 Don’t be a hero. Whether it is due to lack of knowledge or experience, or not having the right tools, you will not be able to carry out every repair. Sometimes, you have to refer the problem to a professional.
No. 22 Find out what your repairman’s favorite afternoon snack is, and then take it with you for your next repair.
No. 23 No matter how you break it. Just don’t lie to your bike mechanic.
No. 24 Never push your bicycle into a store and expect on-site repairs. You don’t know what your mechanic has to face on any given day.
These are brakes
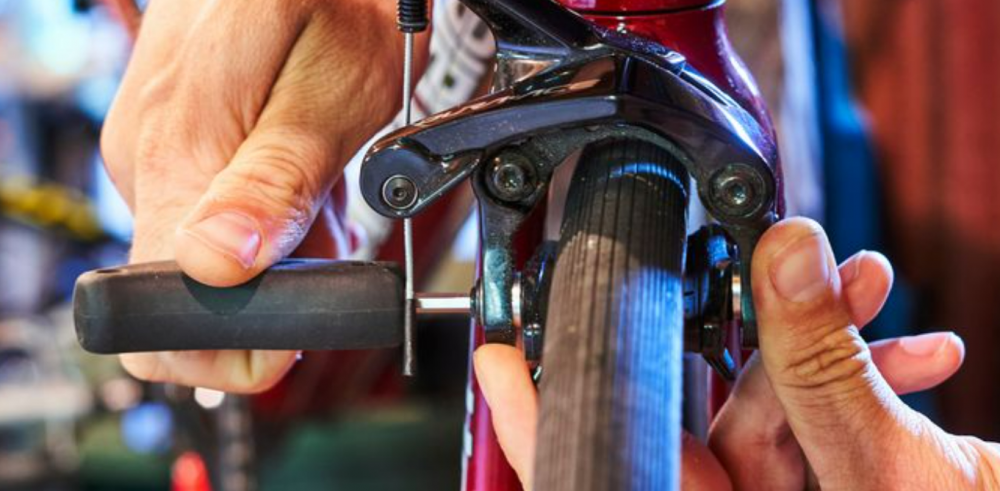
No. 25 Three signs of brake pad wear: You hear a hoarse scratching sound, the groove on the brake pad has almost disappeared, or you are sticky when you brake.
No. 26 Do not touch the disc brake pads with your fingers. The oil on the skin reduces their braking power.
no. 27 Deal with one brake at a time so that you always have a complete brake for reference.
Article 28 When venting the brakes, be sure to remove the disc brake pads. Use shims (such as Avid’s bleed block) to hold the piston in place.
No. 29 If you have been using bolt-on brake pads and it’s time to replace them, it’s time to switch to cartridge type brake pads. Next time your electrode pads need to be replaced, you only need to slide them into the holder without alignment.
No. 30 After removing the disc brake wheel from the frame or front fork, do not squeeze the brake lever. Doing so will cause the brake pads to be clamped tightly together-and separating them is not an easy task.
No. 31 When replacing the brake cable, first adjust it so that the brake pads are completely against the rim, and then squeeze the brake lever as hard as possible several times to release the slack of the cable and compress the shell. Repeat these steps until you feel that the cable and housing are no longer deformed. Now adjust your brakes the way you want.
No. 32 Polished brake pads with sandpaper.
No. 33 When adjusting the rim brake pads, press the brake lever with a rubber band.
no. 35 If your wheel does not sit upright on the bicycle after the hub has been overhauled, make sure that the spring on the quick release device is installed correctly. The tapered end should always face inward.
No. 36 Over time, the sealant on the tubeless device will dry out and its effectiveness in preventing leakage will decrease. Update every three months (if you have a mountain bike, update every month).
No. 37 Many experts tell you to use the level on the saddle as a comfortable starting point. They may forget to mention: your bike must be on a level surface to work properly.
No. 38 Forget what kind of valve do you have? The Schrader valve is similar to the valve on your car; the presta valve is thinner and has a small nut that must be opened before inflation.
No. 39 The place where the gravel is hidden: brake pads, between inner tube and tire, cleats and pedals.
No. 40 If the carbon part is moved when it should not be moved, it may be scratched or damaged.
No. 41 If you squash frequently, you are almost certain that the PSI (air volume) in your tires is too low.
No. 42 The difference between the axis and the main shaft: the shaft remains stationary, while an object rotates around it (think of the wheel); the main shaft rotates in the stationary body (think of the bottom bracket).
No. 43 Pull your spokes often so you will know what it feels and sounds right. When a person feels uncomfortable or its tone is different from others, you know that your spokes are loose.
No. 44 Install the quick release fork so that the lever is on the non-drive side.
No. 45 The easiest way to take out the rear wheel is to shift to the highest gear so that your chain is on the outer (smallest) gear. If it is in the middle or all the way to the inside, it will be difficult for you to pass the gear through the chain and derailleur.
No. 46 If the type on the front hub is not read from left to right when you are sitting on the seat, your wheels are installed backwards.
No. 47 Most newer bicycles have a sealed cartridge bottom bracket, which means you can use it for three to five years (even if you ride a ton) and never have to touch it. In fact, if yours is loose or worn, the easiest way is to buy a new one. The exchange takes about 15 minutes, but it’s best to leave it to your mechanic—not because it’s difficult, but because it’s cheaper to pay someone than to buy tools you need but rarely use.
Cable and enclosure assistance
No. 48 Avoid shredding fingertips. Always cover the end of the newly cut cable.
No. 49 uses a bicycle cable cutter to cut the cable. You will get a cleaner cut with no frayed ends on the cable or sharp burrs on the housing.
No. 50 Do not use a brake housing with a shift cable or a shift housing with a brake cable.
No. 51 A few drops of Teflon oil in the cable casing can solve the problem of brake stickiness or slow speed change. (But don’t try this with electronic shifting!)
No. 52 When installing a new cable, please use the old cable casing as a guide for cutting the new casing.
No. 53 cuts the shift housing square and brake housing at an angle.
NO. 54 uses a metal ferrule instead of a plastic ferrule at the entrance of the housing of the rear derailleur. The plastic ferrule is easily broken due to the annular entrance.
If you want to know more accessories, please leave me a message, I will reply you as soon as possible